Technical Support
-
Getting Started
-
Audio
-
Moving Around
-
Sharing & Presenting
-
Trouble-shooting
-
Access
-
Sessions & Access
-
Tips & Tricks
-
iC2 Help
To access an iSee session you will need to install the iSee client on your computer and be given access to a session by an iSee licence holder such as your host institution.
The iSee client for either Windows or Mac can be downloaded from here.
Large organisations using iSee may have their own specific iSee client or have a version of the client available on their internal software catalog for those installing it on an institution owned device.
To log into iSee you must have either a user account created for you by your host institution, have been sent a valid guest access link by an iSee host or be connected through a link in a Learning Management System such as Blackboard, Moodle or Canvas.
If you have valid access to iSee through one of the above methods then difficulties in connecting are usually due to a network configuration issue on your computer. To rectify this:
- Check your computer's proxy settings and ensure they are correct for the network you are currently connected to
- Check you are only connected to one network, either LAN, WiFi, tethered or mobile network. Disable or disconnect additional networks
- Check you can browse an external web site with your default browser
- Check iSee is set to Use Default Proxy on the iSee Hub settings page or if you are on a corporate network contact your network administrator for the proxy details to enter manually
- If you are trying to connect on a corporate network that is blocking your access you can try tethering your computer to your phone to avoid the local network blockage
- Launch iSee Hub and login (See “Where can I find iSee on my computer?”)
When iSee is installed, it will create a shortcut to the iSee Hub on the desktop. If this shortcut is no longer there, you can find it in:
Windows - C:\Program Files\iSee2020\iseehub\iseehub.exe
Mac - Applications\iSee2020\iseehub
If you are using the QLD DoE version, you can find the find it in:
Windows - C:\Program Files\iSeeQLDDoE\iseehub\iseehub.exe
Mac - Applications\iSeeQLDDoE\iseehub
It is recommended to create a new shortcut from this executable.
If it is not in this location, then you either need to download and install iSee, or you have a portable version of iSee. The portable version will create a shortcut to the iSee Hub in the directory it was installed in.
Currently iSee is only available for Windows or Mac OS machines.
You can find the requirements for iSee here.
It may be that you are the first to connect to the session and no-one else is online. If that is not the case then:
- You have either connected to the wrong Organisation / Session or your client has failed to connect to the server correctly.
Check the Organisation and Session details provided to you in the iSee meeting invite. If in doubt exit the Session and re-enter
If the status indicator (Bottom right of the iSee window) doesn’t light up (usually three bars) but remains grey your client has not connected correctly, exit iSee and re-launch. If the problem persists contact your iSee Organisation administrator
While iSee doesn’t have any hard limits, we do recommend limiting a session to 50 participants for performance reasons.
However, events of 80 - 90 participants are possible. If you are planning an event of this size, here are some recommendations:
- Try to limit the number and content of smart boards and objects in the session.
- There are various roles you can give to participants that can help performance if certain features aren’t required. For instance you can set everyone to start with video disabled.
- Try to use a large environment that sections off participants. When a participant goes out of range you no longer receive their microphone, increasing performance. Similarly when a participant goes out of sight their video is no longer sent and their avatar is no longer rendered.
- Have a couple of dedicated support people in the session. This will help the event run smooth for the people running the event. Upon request we can organise to have our own support staff attend if required.
- Let us know! If we are aware of the event then we can offer advice and ensure there is ample staff on call for support, particularly if the event is after hours.
iSee uses real time video and audio which for full performance uses of a number of TCP and UDP ports.
If iSee detects that UDP ports are being blocked by a firewall it will automatically go into encapsulation mode so that can be used over TCP ports - although some corporate networks block these ports as well.
If you require unblocking of your corporate network for iSee, have your network team contact us at support@iseevc.com and we will provide a list of of required ports, URL's and IP addresses to unblock for your network.
If your organisation uses border authentication please follow the procedure below when connecting with iSee.
- Ensure system proxy settings are correct
- Establish border authentication following your organisations instruction
- Download and install iSee from www.iseevc.com.au
- Launch iSee Hub
- Open the settings panel
- Check your organisations proxy details are correctly entered
- Return to login page by pressing the “Save” button and log in
You will get this notification if you have not connected to the iSee Video server. Please exit iSee and try to reconnect.
This will most likely be a firewall or anti-virus issue where your firewall or anti-virus software may be blocking ports required for iSee to function. Please refer to the FAQ "How do I connect from behind a firewall?"
If you have Windows setup in S Mode you will not be able to run iSee until you leave S Mode. Windows S Mode explicitly blocks you from installing applications unless they have come from the Microsoft Store.
Microsoft will allow you to switch from S Mode to another Windows version but you will not be able to return to S Mode.
Please consult the following Microsoft information here to see if leaving S Mode is suitable for you.
iSee uses the current output device selected on your operating system. Ensure that this selected output device is correct. You can select your output device in the following locations:
Windows: Settings > System > Sound.
Mac OS: System Preferences > Sound.
Here you can select the appropriate output device. There are also tools to test the audio device here.
Ensure the output device is working properly outside of iSee first. If your device isn’t working, the device may have a separate mute button on it.
If it is still not working you may need to contact your organization’s support team.
If your device is working outside of iSee, you can test your device in iSee by going to Settings > Audio and pressing the “Test Speakers” button which plays a doorbell sound.
If you still can’t hear the doorbell, or can hear the doorbell but not other users, you may need to contact your organisation’s support team or our support team at support@iseevc.com.
If your microphone is not picking up any signal on the “Input volume” meter in the Settings > Audio menu, then your microphone may not be set up correctly - so try the following:
Make sure you have the correct microphone selected in the dropdown menu
Check whether it is muted, either on the headset itself (some headsets have a mute button), or in the computer settings, which can be found here
Windows - Settings > System > Sound.
Mac OS - System Preferences > Sound.
Exit iSee and re-launch.
If your microphone is working in the settings menu but is not working in an iSee session (others cannot hear you) then there could be something wrong with your connection or in session settings - so try the following:
Check your microphone is not muted in iSee - This will be indicated by the large centre button at the bottom of the iSee window being red, and the microphone button in the top left of the iSee window will have a line through it. (note that you may also be on push to talk mode, which is indicated on the button to the left of the mute button at the bottom of the iSee window)
Check if the input meter is moving - This is the green filling to the microphone icon on the button in the bottom centre of the iSee window. This green filling should go up and down with your microphone input.
Check if others can hear you - You can use the text chat to communicate to others and ask if they can hear you.
If your input meter is moving, but they can’t hear you, make sure they don’t have you muted on their end. They can tell this from the speaker icon on your avatar when they hover over you, or in the users tab.
If they still can’t hear you, try leaving the session and then returning.
If you are still having issues with your microphone, you may need to contact your organisation’s support team or our support team at support@iseevc.com.
It’s likely that one of the users in the iSee environment near you is using an array microphone which is the type of microphone most modern notebooks are fitted with. These types of microphone devices generally are highly sensitive and pick up a lot of background noise which can be quite disturbing in an iSee session.
Background noise can also be a problem when a user is using their Speakers as the default output device. We recommend that all users use external headsets with microphones for the best iSee experience.
To help to identify the person with the background noise you can temporarily mute individuals around you by moving your cursor over their video avatar and clicking on the speaker symbol from the control bar that appears at the top of their video.
Once you have identified who the noise is coming from you can either leave them muted if their audio is unimportant to you, or ask them to connect their headset microphone/check their audio settings to make sure their headset is selected.
If they don't have a headset microphone you can ask them to go to 'Push to Talk' mode which they can activate using the button to the left of the mute button in the bottom centre of the iSee window, or the pull down menu at the top left of the iSee window, next to the microphone icon. This will mute their microphone unless they are holding down the 'T' key to talk.
Check your default audio output device in your computers control panel. iSee will always use your computers default audio output device. Usually the default device will change when you connect a USB headset but this is not always the case.
Some audio hardware comes with additional drivers and audio enhancements that are not compatible with the underlying Unity3D game engine that iSee uses.
If you are using third party audio hardware with your computer and the audio in iSee sounds garbled try these fixes:
- Disable any audio enhancements in the sound settings
- Unplug the 3rd party audio equipment and use the original computer audio hardware
- Try a different brand headset
There are known issues with the Phoenix Duet speakerphone.
There are three main methods in iSee to move your avatar.
On screen controls
In the bottom left corner of the iSee window, there is the on screen movement panel. This can be used to move and rotate your avatar. It can also be relocated or minimized using the two smaller buttons on the bottom left and right corners of the panel.
Keyboard controls
You can move your avatar by using the ‘W’ ‘A’ ‘S’ and ‘D’ keys and rotate with ‘Q’ and ‘E’.
You can also use the arrow keys to move forward and backwards and rotate side to side if you prefer, but it can be more awkward when used in conjunction with the mouse controls.
Mouse controls
You can rotate your avatar in any direction by clicking and dragging in the direction you would like to rotate. This is commonly used in conjunction with the ‘WASD’ keyboard controls described earlier. If this rotation is inverted or doesn’t feel natural, you can invert the rotation direction in Settings > Mouse in the top left corner of the iSee window.
You can move your avatar to most locations by double clicking on the ground in the location you want to move to. This can be changed to instantly “leap” you to a location by enabling “Leap Mode” in the top right of the iSee window.
If you right click on the ground in most locations, you will be given the option to “Walk There”, which will move your avatar to the location, or “Teleport” which will instantly teleport your avatar to the location.
Pressing the 'H' key when you are in an iSee session will display the help screen for moving around.
Below are two methods of performing a right click on a Mac.
The most common is to use the control key (Ctrl), press and hold the Control (Ctrl) key while you click the mouse button.
If you don't have a mouse but only have a trackpad you can enable the two finger trackpad right click. This can be done via the following procedure:
- System Preferences -> Trackpad
- Open the Trackpad and navigate to the Point & Click tab
- Check Secondary click is checked and the Click or tap with two fingers option is selected
- You will see a short video example of the proper way to click
- If you now go to Finder and use the two finger method as shown in the video the context menu should appear, apply this method whenever you need to right click in iSee
Further information and details can be found here.
When you teleport to another person in iSee, you are teleported to the exact position of the user you selected. This means that you may have landed on top of the person you selected. This is the reason you can hear them but cannot see them. Use your left/right arrow keys or click and drag your mouse to swivel around and you should be able to see them.
Please ensure that you are not using the Overlay View feature on a display board. If you are in Overlay View you will not be able to move around the environment. You will have to right click on the board in front of you and choose either '3D View' or 'Snap View' to be able to move around in the 3D environment.
When your cursor is hovering over a board in 3D view this disables the movement controls. Move your cursor off the board and movement controls will return.
There are rare occasions where your controls may become locked. If this occurs, leave the session and re-enter.
Please check that you have connected properly to the iSee servers. You can do this by checking the network indicator bars on the bottom right corner of the iSee window.
You should have 3 green bars indicating a Good connection, 2 orange bars indicating an average connection and 1 red bar indicating a weak connection.
If you have three empty grey bars, this means that you have not connected properly to the server. Please exit iSee, check your network connection and re-launch iSee. If the problem persists, it is possible that your network is congested.
To check if your network is congested you can check your download and upload bandwidth using an online bandwidth measuring tool such as Speedtest.
For robust iSee performance we recommend a minimum upload bandwidth of 0.5Mbps and a minimum download speed of 1.5Mbps. iSee will work to some degree at connection speeds slower than this but performance may be significantly degraded.
Please contact the iSee support team for further help regarding this issue.
File extensions for board content are currently cases sensitive and must be in lower case to be displayed. Files with UPPER CASE file extensions e.g. ***.JPG will display an uploading symbol while uploading but will not display on the boards.
To display a file with an UPPER CASE file extension, rename the file to a lower case file extension before uploading.
Because the number of boards in an environment has not been limited, the upload limit has been set to 95MB to reduce the potential load times and network interruptions.
You may also have certain upload restrictions placed on you during a session based on the permissions your organisation has given you. If this is the case you may need to contact your organiser.
iSee doesn’t currently support password protected PowerPoint presentations, please don’t attempt to upload a password protected PowerPoint presentation
If the performance indicator is in the red and/or your fan is running fast, this means that there is not enough CPU or memory resources for the application. This can occur on machines that are close to, or below iSee’s minimum specs, or if you have a lot of programs running in the background.
This can cause iSee to stutter, lag, have ‘robotic’ sounding audio among other issues.
To maximise the amount of resources available for iSee, try the following:
Set iSee to run with the lowest quality graphics in the settings menu.
Settings > Graphics > Quality
Close any unnecessary background applications. You can find out what applications are using the most resource using:
Task Manager on Windows
Activity Monitor on MacOS
Make the iSee window as small as possible
You can zoom out your camera by scrolling or using the zoom controls on the right hand side of the screen to increase your field of view.
Before contacting iSee support it's helpful to collect some information on your machine setup and iSee log files to attach to your support message to support@iseevc.com . It is likely that iSee support will request this information in response to your suport request if these are not supplied.
Windows log files
There are three general categories of iSee log files that are stored in different folder locations.
For iSeeHub log files enter %appdata%\iseehub into the Windows search bar. Open the folder -> find the folder called 'logs' -> zip it (right click on it and choose 'Compress to ZIP file' and attach the zipped file to your support request.
For iSee client log files enter %localappdata%\iSee into the Windows search bar. Open the folder -> find the folders called 'Logs' and 'NetworkLog' -> zip them and attached the zipped files to your support request.
For the iSee Player log enter %USERPROFILE%\AppData\LocalLow\iSeeVC Pty Ltd\ into the windows search bar. Open the folder and attach the three .log files present to your support request.
For details on your computer hardware setup enter DxDiag into the windows search bar. Open the DxDiag run command -> click the 'Save All Information' button once the diagnostic is complete -> save the file to a known location and then attach the file to your support request.
Mac log files
iSee log files:
Open Finder
Press command+shift+G then enter:
~/.local/share/iSee/Logs
This directory contains a log file for each time iSee is run, named by date and time. The name of these logs are in the format:
YYYY-MM-DD-hh-mm-ss.txt
Note: Ensure that the log has the time and date of the session in which you had the issue. It is generally easier to find if you sort by "Date Modified".
iSee detailed log file:
Open Finder
Press command+shift+G then enter:
~/Library/Logs/iSee VC Pty Ltd/iSee2020
This directory contains the Player.log file which is much larger and more detailed than the other logs. As such the Player.log file is overwritten every time iSee is run so this log must be saved before opening iSee again. The file can be saved by either or both of the following:
- Copying and pasting the file to a new location
- Re-naming the file to anything except Player. It is recommended that you give the file a name that relates to the time and nature of the issue (eg. Player_disconnect_DD-MM-YYYY).
iSee crash logs:
Open Finder
Press command+shift+G then enter:
~/Library/Logs/DiagnosticReports/
Look for files names with the form *iSee*.crash
Mac crash logs:
If iSee crashes and there is nothing in iSee crash logs then that means the crash was likely caused by the Mac operating system. These crash logs can be found by going to:
Applications > Utilities > Console
On the left side of the panel there is a section called "Crash Reports"
In Crash Reports you can sort by process name.
The process name will start with "iSee" followed by the version you are using (eg "iSee2020")
Look for the report with the same time and date of the crash.
These instructions are for connecting to iSee from a NSW DET computer on the NSW DET Network. If you are on a BYOD machine then you can download the iSee client here and you can also follow the instructions there for connecting to iSee on a home network.
To join an iSee session from a NSW DoE network first ensure that the iSee client is installed on your machine. You should have an iSee Hub shortcut on your desktop, if you don’t, See “Where can I find iSee on my computer?”
This currently applies to Windows 8.1 and only happens during the installation. Don’t enter your proxy details into this box, simply press the Submit button with the details left blank.
Your IT support crew may ask for your computer system configuration to help diagnose your issue. Your computer can produce a handy system configuration report to make this easy. Once you have created your system report file you can email it to your IT support crew.
Windows: Type "dxdiag" into the windows search bar and select it. Click 'Save all information...' and save the dxdiag.txt file to your folder of choice. Once saved you can attach it to an email to your support team.
Mac: For a Mac, choose 'About this mac' from the apple pulldown menu. Select 'System Report' then select 'Save' from the 'File' pulldown menu. Save the system report in the file of your choice.
For Windows:
Open Windows File Explorer and navigate to:
C:\Users\"your computer username"\AppData\Local\iSee
For Mac:
Open Finder and press "COMMAND+SHIFT+G" and enter the following location:
~/.local/share/iSee
You should see a list of files similar to the following:

The map files are stored in the folders with the format 5.3.3f1, 2017.4.xx or 2019.4.xx, all of these folders can be safely deleted. Once deleted, the map will be downloaded again when you enter a new session.
Also note that all of the files in this directory are automatically generated and won’t break anything if they are accidentally deleted.
If for any reason the hub won't launch the application, you can launch it from the following link:
https://isee2020manage.iseevc.com/Home/ClientHome
Please also contact support with the details so we can address the issue.
1. Troubleshooting for QLearn iSee LTI
The standard procedure for resolving QLearn iSee LTI issues is to use the troubleshooting table provided below to identify and address the problem independently by the customer. If challenges persist or if the troubleshooting table suggests further action, customers initiate a SCO ticket through the Department of Education (DoE) IT Service Centre for additional assistance.
|
Phase |
Issues |
Common cause |
Instructions for issue resolution |
|
1 |
A student can’t see iSee in the QLearn Canvas Course menu
|
· A student or teacher is enrolled in a QLearn course, but the iSee LTI is not installed in the subaccount where the course is located. · The teacher has not enabled the visibility of "iSee" in the QLearn Course Menu. |
The teacher: · Confirms the student is accessing the iSee LTI via a course that is in the QVSA subaccount. · Selects the “Settings” from the QLearn Course Menu and ensure iSee is visible for students in the QLearn Course Menu · If the issue remains, log a SCO ticket. |
|
2 |
A student or a teacher can’t launch iSee (no screenshot)
|
· The iSee Portal is down. · The iSee LTI configuration has become corrupted on the DoE side. |
The teacher: · Logs a SCO ticket. |
|
3 |
A student or a teacher can’t sign in iSee
|
· Single-sign-on issue. |
The teacher: · Logs a SCO ticket. |
|
4 |
A student or a teacher can’t “join meeting” when the session is active
|
· The individual does not have the iSee Application installed on their device or does not have the correct version of the application installed. |
The teacher: · Verifies if the student is using a DoE device. If not, check if they have iSee installed on their computer and confirm that the version includes the term "qlddoe." The teacher's initial priority is to ensure that the user's device has the correct version of the application installed. · If the issue remains, log a SCO ticket.
|
|
5 |
“Join Session” doesn’t work
|
· The session is inactive. · iSee is down. |
The teacher: · Ensures the student selects the correct organisation and session. · If the issue remains, logs in the iSee Management Portal to ensure all information is correct and the session is active. · If the issue remains, log a SCO ticket.
|


In an exceptionally rare and emergency scenario where QLearn or the iSee link in QLearn isn't working and a teacher and student urgently need access to iSee, they can do by accessing the iSee Desktop application directly already on their device and using a temporary MeetingID created by the teacher (see https://iseevc.com.au/apps/help-center#hc-how-to-create-a-meetingid). If they are using their personal device and haven't yet downloaded the application, they can obtain it from this link: https://iseevc.com.au/pages/qld-download. It's essential to note that the version of the iSee application they download onto their device must include the term "qlddoe" in the version name.
2. Escalation path for the DoE IT Service Centre Consultant
If DoE IT Service Centre Consultant cannot resolve the issue with the I&T branch, they need to advise the customer to:
· Ask the customer to escalate the issue to qva@qed.qld.gov and ensure that all investigation details, including the SCO ticket number, are included in the escalation email
· Close the SCO ticket.
For further information on DoE internal escalation workflow, refer to the Operational Agreement CM Ref 23:771627).
Note that clearing browser cache can influence performance as well as solve issues. 'Cookies and other site data' and 'Cached images and files' are usually the most critical from an issues perspective. Clearing your cookies will cause your browser to forget your settings for websites your have vsisited previously and clearing cached images and files will increase loading times for the first time you revisit any websites post clearing.
For Chrome:
Open Chrome and press 'Ctrl'+'Shift'+'Delete' to bring up the 'Clear Browsing Data' window. Check or uncheck the boxes as required.
Then select the time period - if unsure choose 'All time'.
Click 'Clear Data'
For Edge:
Open Edge and select Settings from the top left pulldown menu (three horzontal dots).
Select 'Privacy, search and services' from the Settings menu, then got to the 'Clear browsing data' section and click the 'Choose what to clear' button.
Check or uncheck the boxes as required.
Then select the time period - if unsure choose 'All time'.
Click 'Clear now'
It takes up to 80 seconds for a user disconnection to be completed after an application crash. If a connection is attemped during this time the user will be redirected to the session selection screen.
To resolve, keep trying to reconnect and the connection will be successful within 80 seconds.
If the connection is not successful then the issue is unrelated to the application crash and may be related to other causes such as a network outage.
There are generally three possible causes:
- Your mouse has become disconnected or run out of batteries
- You are clicked into another window and your mouse pointer is not active in iSee
- You have activated Accessibility Mode which deactivates mouse inputs and maps everything to keyboard commands. For how to exit accessiblity mode see here
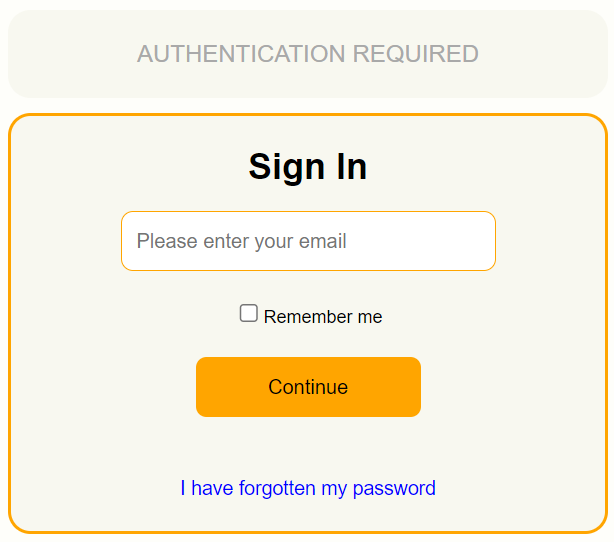
To sign in to the management portal you need to have an iSee account with some sort of portal admin rights. These rights along with account creation are granted autmatically to teachers signing in with their institutions single sign on (SSO) system provided that SSO integration has been completed with your host institution.
When signing in you will be presented with the sign in prompt below
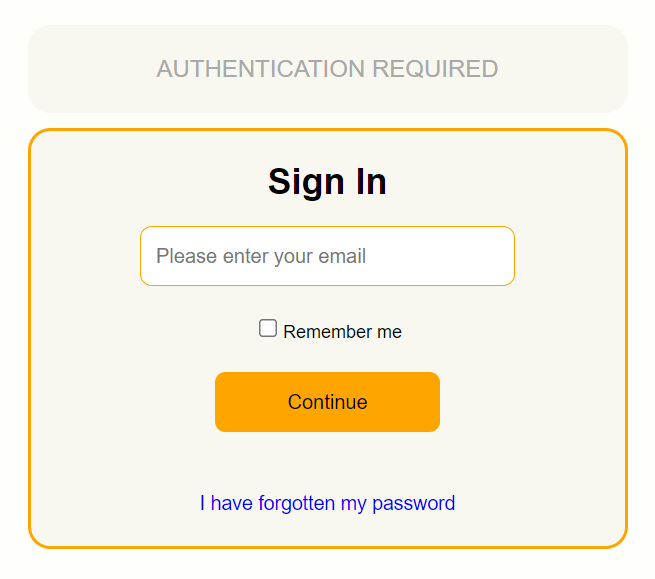
If you are having sign in difficulties ensure that:
- You are using the correct email address for your account
- If you have forgotten your password click 'I have forgotten my password' to have a password reset link sent to your email address
- If your email address isn't working and you think you have an active account ensure that you are using the right management portal for your organisation - see here
Occasionally SSO users get the following error message
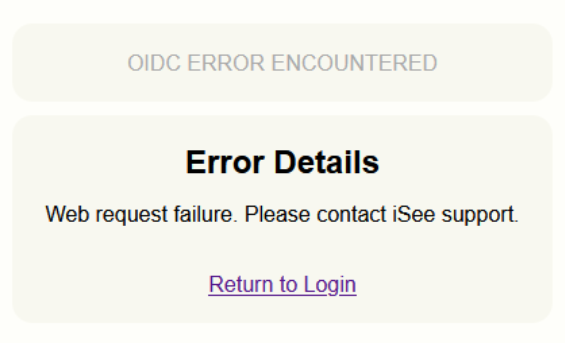
This error occurs when the entitlement for the iSee management portal has been removed from your SSO account by your host institution's IT system. Your SSO login may still be working, it's just that your host institution's system does not currently list the entitlement for its use with the iSee management portal. If this occurs you will need to submit a ticket with your institution's IT team asking them to reinstate the iSee management portal entitlement to your account.
Microsoft users will sometimes get a popup in the middle of their screen that says 'Debug Assertion Failed!' as below.
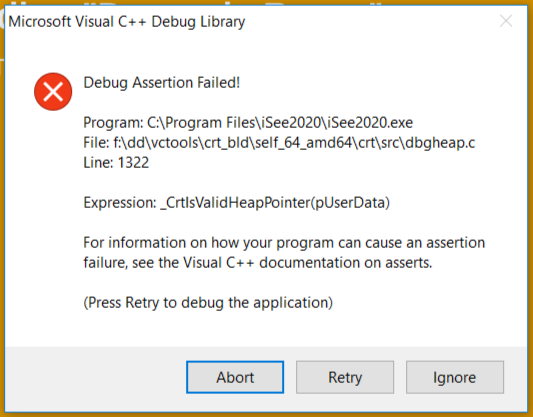
This is due to a temporary error occuring in the audio codec iSee uses. It seems to be more common on devices when the CPU is under a lot of load.
Simply click 'Ignore' and continue using iSee normally.
Some advice on naming conventions:
- Include the Term and Year in the title. This is so if the event or class is repeated the next Term or Year then any enrolments are not confused between the two sessions.
- Use enough description or key words so that participants can easily recognise it and pick it from a list
- Don't include any apostrophes (') in the session name - this will cause chat messages to stop working while in iSee
iSee does not currently support native pen input from a Microsoft Surface Pen.
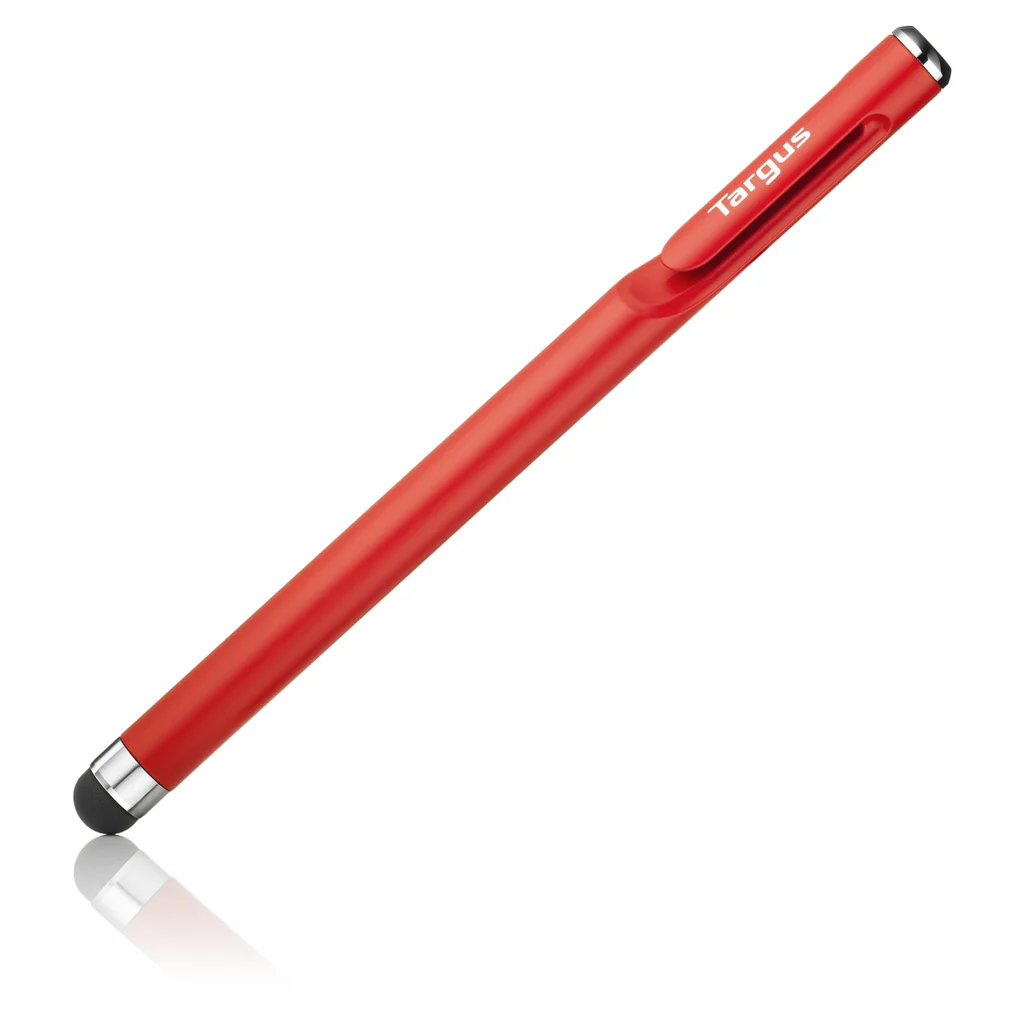
In Windows 10 it is possible to the Microsoft Surface Pen as an annotation input device by going to Settings -> Devices -> Pen & Winbdows Ink, and then check the section that says "Allow my pen to act as a mouse in legacy options". This makes the pen act like a mouse input and so will annotate on iSee boards, but without the pressure sensitivity of the native surface pen input.
Note that you can annotate or draw on boards in iSee on a Microsoft Surface device by simply using the touch screen input. You can use either your finger or a touch (capacitive) screen stylus such as this one from targus
This alert has been seen with some of the newer versions of MacOS.
If you are experiencing this issue then please Contact Support
If you are recieving notifications that say:
"Check System Preferences -> Security & Privacy. Permission to use the camera is disabled. Your video will not be seen by other users."
And/or:
"Check System Preferences -> Security & Privacy. Permission to use the microphone is disabled. Your audio will not be heard by other users."
Open System Preferences and select Security and Privacy.
Select the "Privacy" tab and make sure that "iSeeLauncher" (and any other iSee related options) are selected in both the "Camera" and "Microphone" sections.
If these options aren't available then contact your organisation's support team or iSee Support
Other programs that use the microphone can “take ownership” of your microphone while they are open, preventing other programs from using it.
Ensure all programs that require microphone permissions are using a different microphone or, ideally, are closed.
There is a unique case where Zoom (versions earlier than 5.9.3) will retain ownership of your microphone even if you have closed it.
To resolve this, update Zoom to version 5.9.3 or higher.
Accessibility is supported in two main ways.
For those who have mobility impairment there are a range of methods and devices that can be used to navigate around iSee worlds. These include:
- Mouse - using click and drag to look around and double click on the floor to move
- Keyboard - using the WASD to move around, QE to look right and left or the arrow keys (space bar to jump)
- Touch screen - touch and hold the on screen movement icons to move around
- XBox controller - use the standard thumb toggle controls to look and move around
- XBox Adaptive Controller - create a custom hardware solution that meets individual needs
For those with vision impairment there is the ability to map all controls to the keyboard and activate an in game screen reader for navigating the menu items and describing the environment. The spatial audio means it is also possible in some circumstances to navigate via sound once in an environment. To activate, open the settings tab in iSee Hub and select checkbox for "I am blind or vision impaired"
Using the Management Portal requires an active SessionHost or Admin account provided by your organisation.
SessionHost access automatically created for staff the first time they sign in to iSee using their department credentials provided their organisation has an iSee contract that includes integration with their federated access account system.
SessionHost Users can:
- Log into the Management Portal
- Create new user accounts
- Create a new iSee session with a selected 3D environment
- Enrol or invite users into their sessions with a specific session user role
- Add or remove other SessionHosts to their sessions
- Change the 'Active' status of a session
- Generate usage reports
SessionHosts Users cannot:
- Change user passwords
- View, access or edit other sessions unless they have been added as a Host to the session
- The 'Home Screen' appears as soon as you log into the management portal or click the 'Home' (house) icon in the left hand panel
- It provides a list of the sessions you have administrative access to
- The coloured indicators show if a session is currently open to users
- The blue session name is clickable to edit, delete or clone the session
- Click on the pen symbol to change the 'Active' status of the session
To manually set up a new session for users you will need to log into the management portal with an Admin or SessionHost account. Staff of organisations that can sign in with their department sign in usually have SessionHost access for the Management Portal by default.
You can access the Management Portal here. Follw the instructions on the page to manually create your users and sessions.
MeetingID's are a way of granting temporary access to a specific iSee session. Each MeetingID is encoded with a specific access time period and session role, and can be shared amongst a number of users. The MeetingID is automatically erased from the system once the access time period has passed.
As MeetingID's can be shared - using them as a general method of access is not considered to be secure and they should only be used in specific circumstances with this in mind.
To create a MeetingID, choose and sign in to your organisation's iSee Management Portal here (you will generally need to be a staff member of your organisation to have access).
Once signed in:
-
Select the 'Invitations' icon from the left hand panel to open your Invitations page
-
Click on the blue '+' symbol on the screen to create an new MeetingID
-
Select the 'Session', iSee user 'Role', 'Timezone' for the MeetingID - choose a ‘Student’ or ‘Advanced Student’ role for students
-
Edit the 'Start' and 'End' times for the MeetingID to match your desired period of access
-
Click the blue 'Create Meeting' button to create the MeetingID
Now the MeetingID has been created it will appear in your Invitations list. Simply copy the MeetingID and distribute it to those you would like to use it by email or other digital channel.
You may delete or edit the MeetingID at any time by selecting the checkbox beside the invitation and choosing from the blue buttons at the bottom right hand corner of the window.
To use the MeetingID simply search for ‘iSee’ in your windows search bar and open the ‘HUB’ app. Once the iSeeHUB is open, sign in and add the MeetingID in the optional field before progressing to your session.
iSee performance is generally not an issue on devices and networks that meet the recommended specifications - see https://iseevc.com.au/blogs/guides-tutorials/isee-system-requirements
What to expect using iSee with weak devices
- Less than 4 CPU cores is likley to give slow and stuttery performance for video and audio when using other applications such as web browsers either inside or along side iSee
- Integrated graphics may have stuttery performance for iSee window sizes greater than 1080p
- 8GB or less of RAM will cause occasional screen freezes as RAM is compressed to make more space - especially if changing zones in iSee or iSee is used in conjuntion with mulitple browser tabs
- Devices under high load using iSee may thermally throttle, at which point performance issues will increase immediately and substantially
- Older devices with slower processors, hard drives and RAM will take longer to load and connect to the iSee environment, expecially if there are web browsers on boards in the zone
Creating a better experience on weak devices
- Close all non-essential applications on the device and design the lesson/activity to minimise/avoid the use of other applications
- Set the graphics settings in iSee to 'Low'
- Reduce the size of the iSee window to fill only part of the screen
- Avoid the use of websites on boards in iSee
- Avoid the use of web browsers and multiple browser tabs at the same time as iSee if possible
- Avoid the use of high definition video on boards in iSee and viewing videos in full screen 2D view
- Avoid the use of large custom imported 3D models in iSee
- Choose a smaller map for your iSee session if possible
- Avoid the use of screen sharing in iSee
- Keep the number of participants in each iSee zone below 30
What to expect using iSee on a poor network
- Maps and content will take longer to load
- Video from other participants may take a long time to appear, drop frames or become static
- Network dopouts will result in audio dropouts along with delayed content and movement updates
- Network dropouts longer than 80 seconds will result in disconnection from the session
Creating a better experience on poor networks
- Use the same device each time to automatically take advantage of environment and content caching that reloads previously visited maps and content from the local drive
- Avoid large files on boards and introducing large amounts of new content at any one time
- Reduce the size of video files - see https://iseevc.com.au/apps/help-center#hc-using-handbrake-to-reduce-video-size
- Avoid streaming video sites such as Youtube
- Reduce the size and quality of image files
- Use 'Minimise size (publishing online)' when publishing PDFs for use in iSee
- Avoid screen sharing if possible
- Avoid large custom 3D models
- Build in time for participants to download and sync their content
- Be aware of other uses of the network that may be using the avilable bandwidth
- Close or minimise other applications that may be using bandwidth such as web browsers and web applications
HandBrake (https://handbrake.fr/) is a fantastic, free and simple to use tool for reducing the size of video files for use in iSee.
Once installed you simply drag and drop you video file into HandBrake to begin.

Once your video is loaded choose the 'Video' tab and set the average bitrate to 250 (300 if you want higher quality). Also select the location you want the file to be saved to.

Reducing the video bitrate has the biggest impact on file size, but if you want to reduce size further you can also go to the audio tab and set the Quality to 'Quality', and the size to '1', set the Mixdown to Mono and the Samplerate to 24.

Once this is done click the green 'Start Encode' button at the top to encode your file optimised for iSee.
It is possible to create a wide range of formatted text and special charachers such as emojis on iSee boards, in the chat and for your display name by using 'rich text codes'. These codes are kind of like HTML although they are not HTML.
Some commonly used examples are:
Font size
<size=50> text </size> will set the font size to 50 for the text and then return the font to the previous size
<size=50%> text </size> will decrease the font to 50% of the default for the text and then return the font to the previous size
<b> Bold </b> Bold
<i> italic </i> italic
<u> underline </u> underline
<s> strikethrough </s> strikethrough
<sup> superscript </sup> superscript
<sub> subscript </sub> subscript
<mark> highlight </mark> highlight
<color=red> red </color> red - this also works for black, blue, green, orange, purple, white, and yellow
<noparse> <size=50> </noparse> does not parse the code in between and so allows you to put examples of code on boards - in this case the board would show only the text <size=50>
For Emojis:
<sprite=0>
<sprite=1>
<sprite=2>
<sprite=3>
<sprite=4>
<sprite=5>
<sprite=6>
<sprite=7>
<sprite=8>
<sprite=9>
<sprite=10>
<sprite=11>
<sprite=12>
<sprite=13>
<sprite=14>
<sprite=15>
Although not all are activated in iSee - you can find a complete list of the rich text codes at http://digitalnativestudios.com/textmeshpro/docs/rich-text/
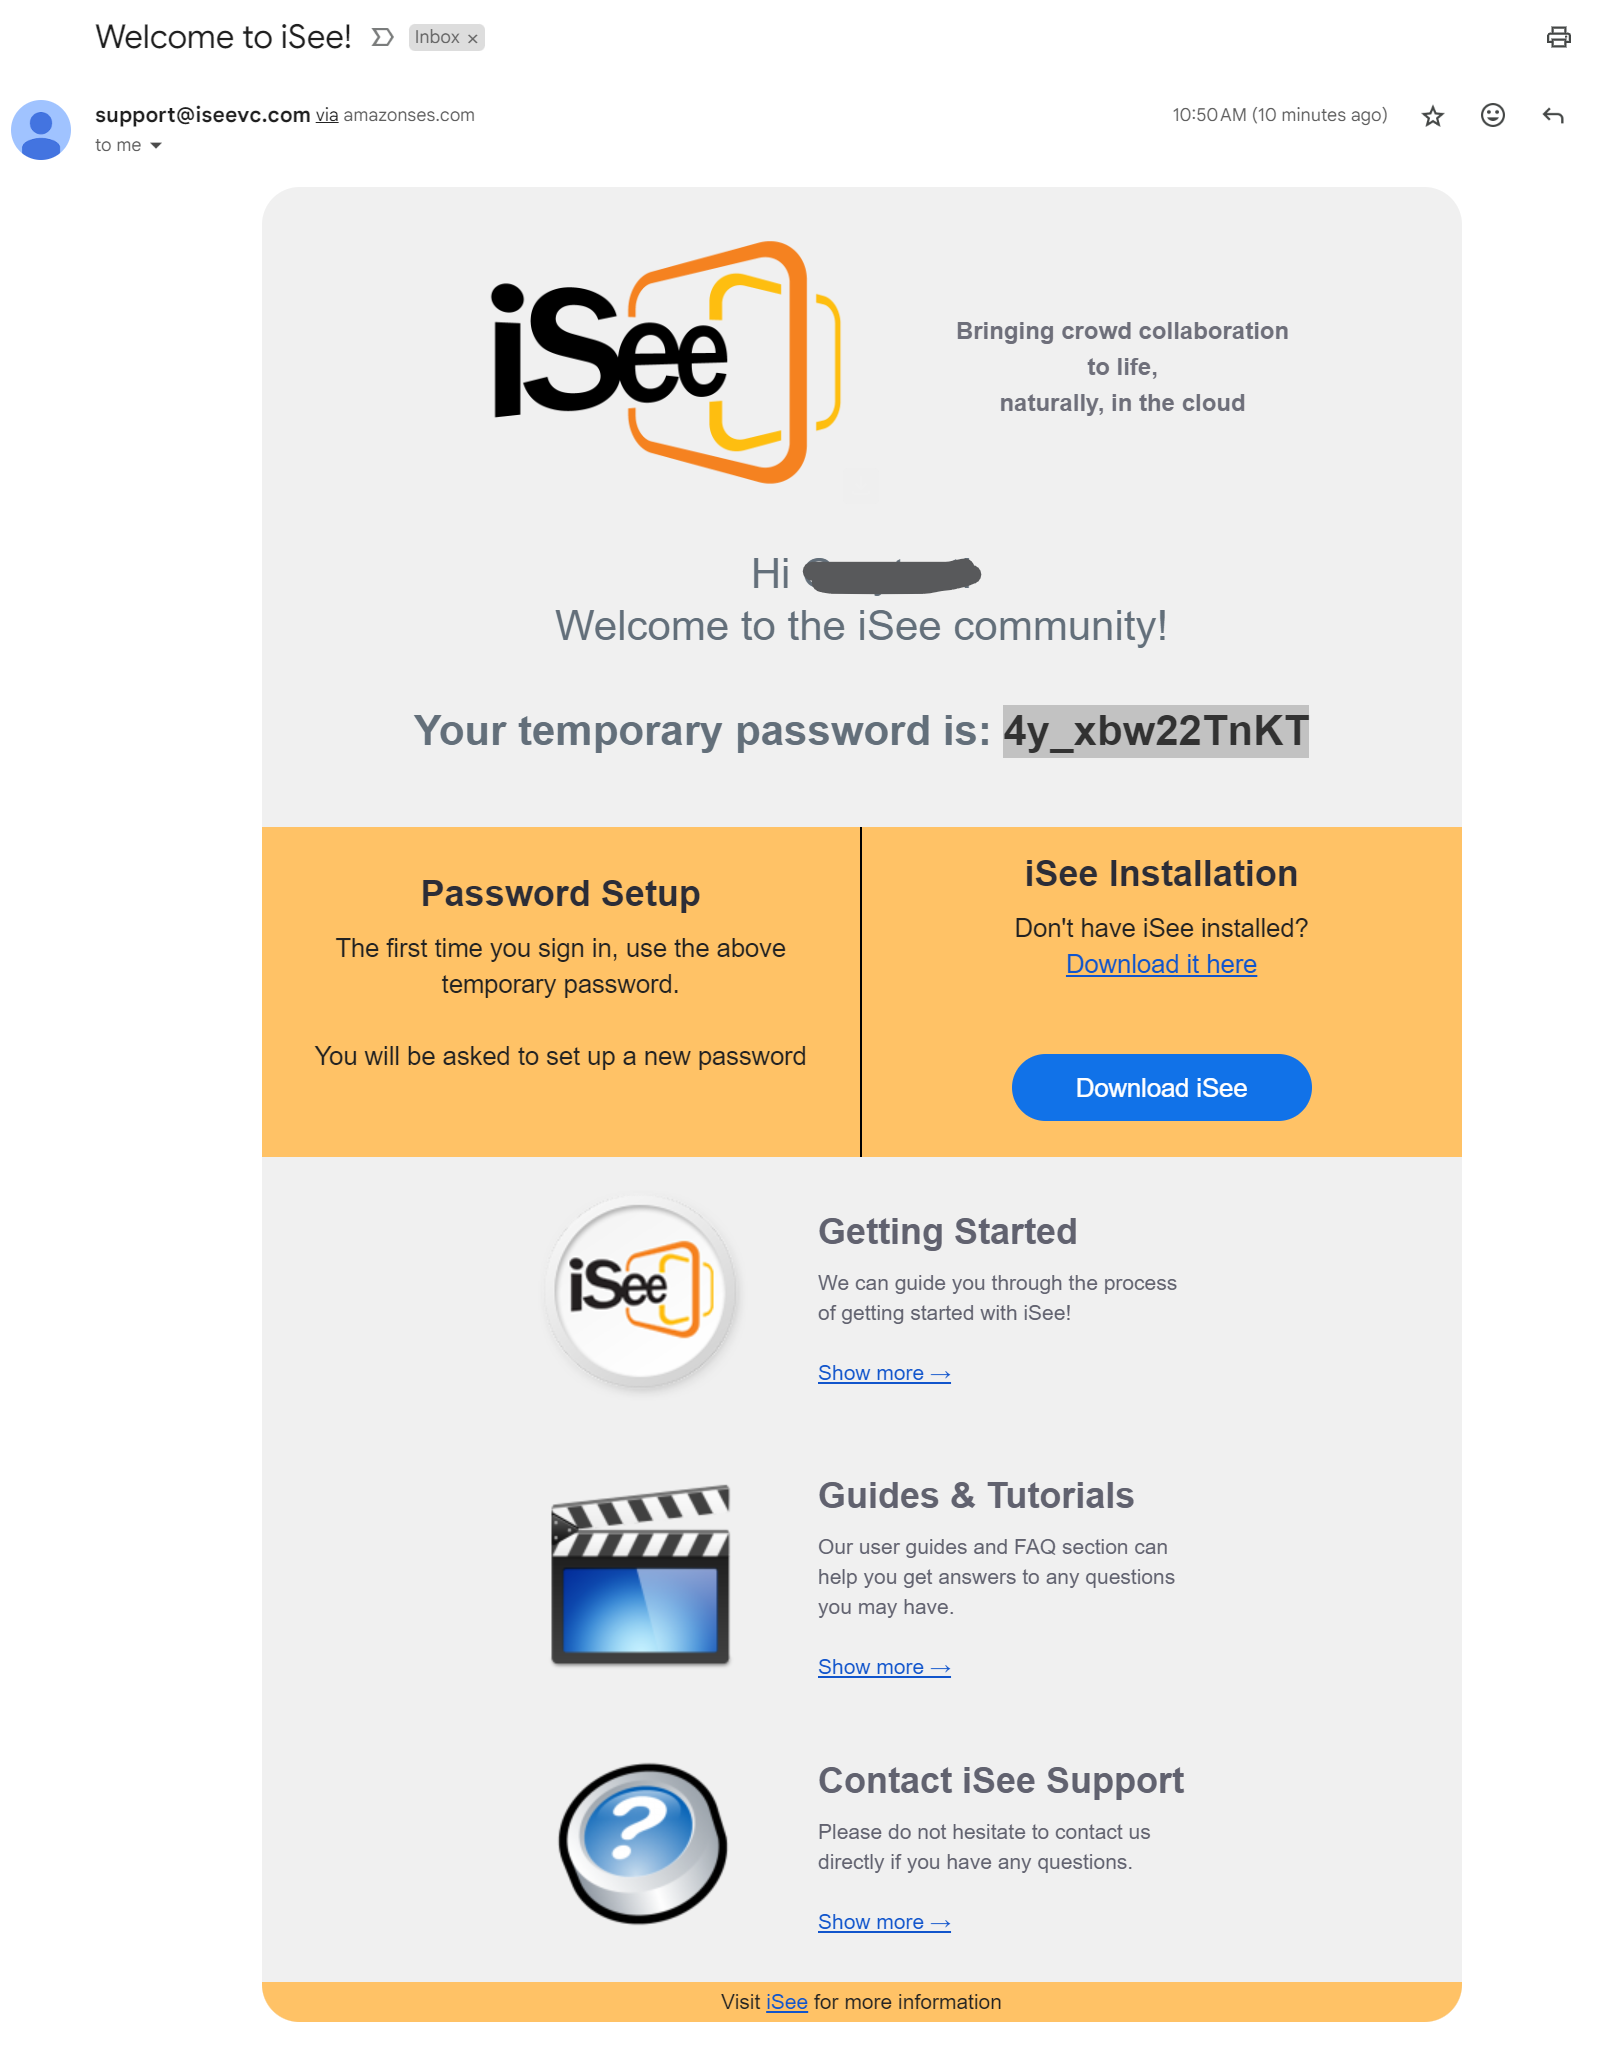
If you are a Qld department user signing into iSee using your department credentials then iSee does not store a separate password for you and you need to reset your password using the standard department system.
If you are non-Qld department user that has had an account created for you, then your password can be reset by a departmen admin or you can reset it yourself by going to https://iseemanageqlddoe.iseevc.com and clicking on the 'I have forgotten my password' link as in the image below
Either password reset method will then send a temporary password to your email address.
Copy this temporary password and open iSeeHub (close and reopen if it is already open). Once iSeeHub is open, sign in with your email address and this temporary password.
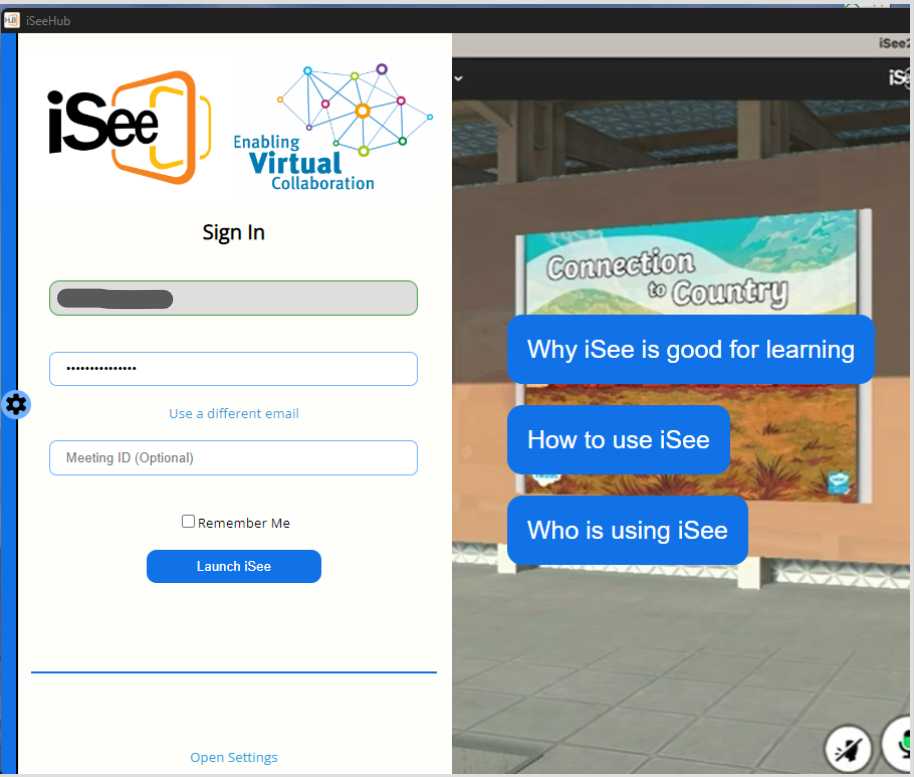
When you click 'Launch iSee' this will trigger a password reset action where you can enter your new password.

Once your new password is entered, click 'Submit' and it will take you back to the sign in screen with your new credentials already entered.
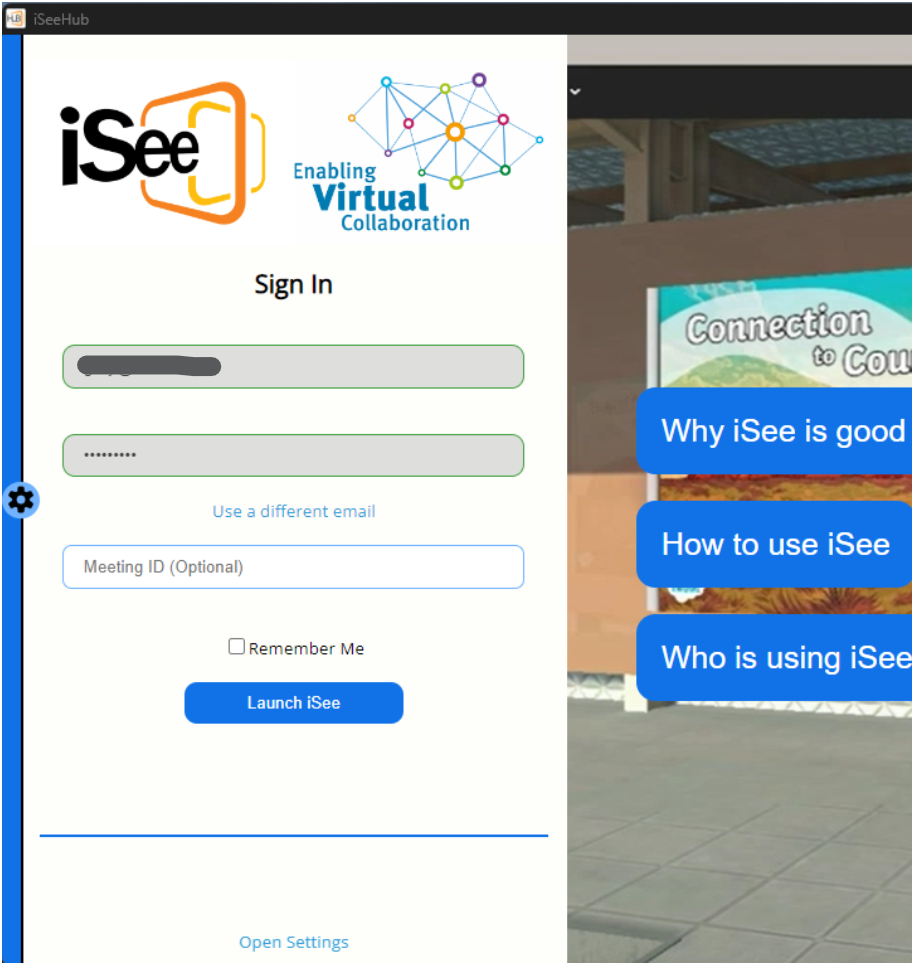
Clicking 'Launch iSee' will now launch the iSee application using your new password.
If the mouse is not active in iSee and there is a narrator/screen reader active then you have ticked the "accessibility mode" option for vision impaired users.
Accessibility mode is designed for vision impaired users who have difficulty using a mouse. It maps the input controls to the keyboard and turns on a screen reader. This is helpful for vision impaired users but can be irritating for users that don't require it.
To turn off accessibility mode:
Exit iSee
Open the iSee Hub
Open the settings menu on the left side of the iSee Hub window
At the top of the settings screen, ensure the "I am blind or vision impaired" check box is unchecked
Press "Save"
Login and Launch iSee
2D view can be a handy way for large groups of people to see a board in iSee during a presentation, or have a better view for annotating or writing on.
Those with a 'Staff' or 'Host' role in an iSee session can usually always access the '2D View' button at the top of the board or right click on the board to select '2D View' from the menu. The same cannot be said for students who's options change depending on how those with the Staff or Host role manage the boards in the session.
The table below shows the method of board 2D view acess for students depending on how the 'Staff' or 'Host' users have set the Boards.
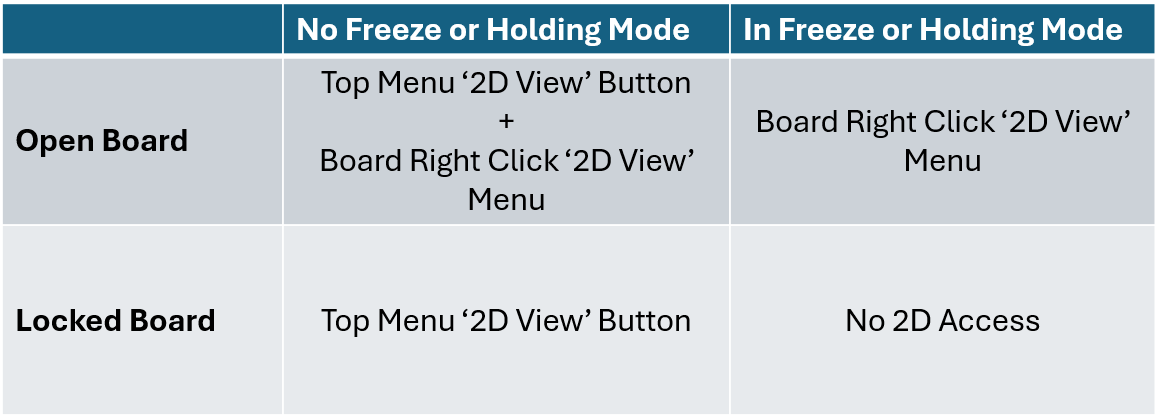
If you want students to have access to the 2D view when boards are both locked and frozen, temporarily unfreeze the boards -> have them access 2D mode -> then re-freeze the boards. Refreezing will not delete their 2D view once launched.
The iSee cloud drive can be a useful tool for storing files for loading onto iSee boards and for sharing files between participants.
The speed of the first opening of the iSee cloud drive depends on the speed of your network connection. The next time you open cloud drive in a session it will be instantaneous as the content is loaded from cache.
If you have a slow network connection and don't want to be impacted during class time, it may be a good idea to open the drive earlier at a less rushed time so that it is cached and opens faster when required during active teaching.
It is currently not possible to close the cloud drive while it is loading. This may cause an issue in class if students with slow network connections inadvertently click on the drive during other work. You can create a custom role for students to remove their access to the cloud drive if this is an ongoing issue and cloud drive is not used by students in your class. See here for creating custom session roles.
It is possible for Organisation Administrators to create custom session roles for use in iSee.
To create a custom session role click on the 'Admin Portal' link at the bottom of the Home page on the standard Management Portal. After signing in go to 'iSee System' -> 'Roles' ->'Session Roles'. Scoll to the end of the 'Organisation Session Roles' and select '+Add' to create a new role or 'Edit' to change an existing role.
When creating a custom role you will need to name the role and then add 'Activities' to the role. These 'Activities' define what the user with the role can do whilst in an iSee session.
For a full description of the different Activities and creating custom roles see here.
Note when creating a role for Staff it is important to include the 'Host Session' activity so that the holding mode is not activated when they are in the session.
What is 'Holding Mode'?
Anyone entering an iSee session without the 'Host Session' activity in their session role will automatically be placed in 'Holding Mode' until someone with the 'Host Session' activity joins.
The 'Host Session' activity is currently part of any public Host or Staff roles is iSee, and can also be added to custom roles either during their creation or by later editing of the custom role. For more information on creating custom session roles see here.
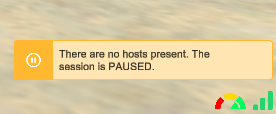
When in 'Holding Mode' the person will see a popup advising them that 'Holding Mode' is active. The popup can be closed for them to explore the environment, but not interact with others or change any of the environment's content.

To remind them that they are in 'Holding Mode' after they have closed the popup, a message remains in the bottom right of the iSee window.
Everyone automatically comes out of 'Holding Mode' and gains their normal session capabilities when someone with the 'Host Session' activity in their role joins the session.
Those without the 'Host Session' activity also automatically go back into 'Holding Mode' should all of the hosts leave the session.
Making the most of Holding Mode
Holding Mode brings two big advantages -
- The ability to leave a session in the 'Active' state throughout the term without worrying about student supervision and wellbeing issues
- The ability to include asynchronous visitation to the iSee space as part of meetups or teaching and learning
Leaving sessions in the 'Active' state
In terms of leaving the session in the 'Active' state, this saves time for teachers in terms of not having to toggle the activity state of the session before and after every class. The 'Active' toggle still remains however, so if there is sensitive material in the space that you do not want to expose to students ahead of time the session can still be made unavailable.
Asynchronous access
There are a lot of ways that asynchronous access can be used to enhance teaching and learning. During 'Holding Mode' board content and 3D models are in the 'frozen' state, but can still be viewed by students including video playback. The video playback controls are blocked for students when in 'Holding Mode', so to have video playing when you aren't there as a teacher set it to 'loop' mode and press play before leaving.
Onboarding - students and staff can access the space at any time to explore and practice moving around. This can be enhance by leaving instructions or challenges in the space to help participants understand and practice different activities. For example you could create a note on a board challenging participants to complete an obstacle course that you have constructed with 3D models.
Pre-class activities - you can have students visit the space in their own time prior to a live class to familiarize themselves with content or watch instructional videos. You can also gamify the experience by setting a scavenger hunt or 'Who am I?' type of activity to encourage students to solve a challenge prior to class.
Post-class activities - students can re-visit the space to remind, reflect and review content that was discussed and created during class time. This may include revisiting their own work to reflect on the learning and creation process during the development of a reflection journal, developing peer reviews of other groups and individuals, or viewing other students ideas prior to the next round of carousel ideation activities.
'Freeze Boards' can be accessed via the dropdown menu that is part of the top bar menu item for Boards for those with the 'Board Host Controls' activity in their session role.
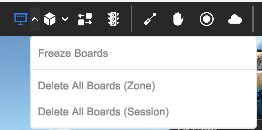
Clicking 'Freeze Boards' removes all of the hover over menus for boards and makes the boards inactive for those without the 'Board Host Controls' role i.e. students.
Putting the boards into freeze is a great way to help manage students attention and allows the teacher to interact with boards during and briefing activities while making them inactive for students.
If the students want to put the board into 2D mode for viewing while the boards are frozen they can right click on the board and choose the '2D View' option.
Boards will remember any previously locked states when coming out of freeze.
Boards are also automatically placed in freeze as part of 'Holding Mode' when a teacher isn't present.
How chat storage works
Text chat messages sent and received during your time in iSee are temporary messages that aren’t stored in a central server. Instead, they are written to your machine's hard drive and stored there for a month. This means that you need to be on the same machine as the live session to retrieve your chat messages.
Exporting today’s chats
The easiest way to retrieve chat messages from earlier in the day is to click on the three vertical dots beside the chat input field and choose the ‘Export Today’s Chat’. This will then open the save file dialogue window and allow you to download the day's chats as a text file to the location of your choice.
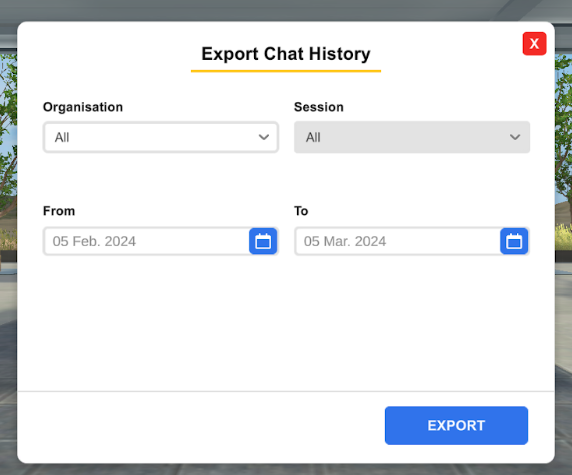
Exporting selected historic session chats
To access and download chat content from up to a month previous click on the three horizontal bars in the top left corner of the isee window and select ‘Export Chat History’.
In the selection popup select the Organisation, Session and Date range you would like and then click ‘Export’. Note that if you don’t choose an Organisation or Session it will download all of the available chats for the previous month.
Clicking ‘Export’ will open the save file dialogue window and allow you to choose the location to save the text file. Note that in the text file the chats from the different sessions and times will be separated and clearly marked.
A number of new features have come into iSee over the past two years that are only avilable after they are added as Activities to session rolls.
The 'Staff' and 'Host' Public Session Roles have been updated to include these Activities, and Admins should be aware of them to update any 'Custom Roles' for their organisations.
The new Activites are highlighted in the table below:
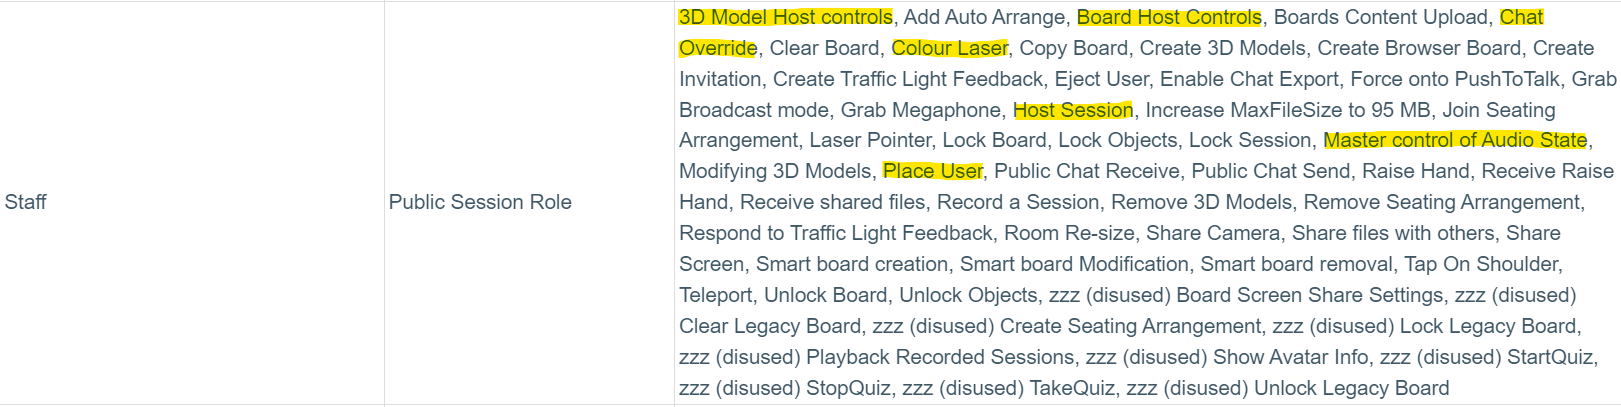
3D Model Host controls - adds the Freeze and Delete controls to the 3D Models icon in the top bar
Board Host Controls - adds the Freeze and Delete controls to the Boards icon in the top bar
Chat Override - gives the ability to pause the chat
Colour Laser - changes the users laser colour to their Avatar colour
Host Session - takes everyone out of Holding Mode and makes the session live when they are present
Master Control of Audio State - allows changing the audio settings of others in the Users Tab
Place User - gives the ability to place others in the space via teleport
There are a few different ways you can move around 3D models in order to place them where you like. There is a comprehensive video for using 3D models, including moving them around, in the 'Using iSee' series you can see here.
Snap Mode:
The simplest way is to click and hold down the left mouse button anywhere on the object and just drag it around. This is called 'Snap Mode' as the object will automatically orient and snap itself to whatever surface the mouse is hovering over. This is simple and easy, but be careful not to accidently click on models you have placed using one of the other techniques or you may activate this mode and snap the model back to the nearest surface which can be irritating.
Snap Mode can save a lot of time and effort provided your 3D model is oriented properly when saved. When saved as a .glb file in Paint3D the model will snap in the same orientation as you see it. However, when saved as an .obj file in Tinkercad the model will save in an orientation where the bottom in iSee is in a plane perpendicular to the model base in Tinkercad. This may mean you will need to re-orient orient your model by 90 deg before saving to have it import to the most convenient snap view orientation. Alternatively you may want to export the model in more than one orientation deliberately so that you have separate versions that are optimized for snapping onto either the walls or the floor.
Free Move:
If you don't want the object to snap to a surface you can use 'Free Move'. To activate just left click and drag on the blue square in the centre of each face. This will let you reposition the object anywhere in a plane parallel with the face the square is on. In this mode you can lift the model off the ground or even move it into other models or terrian.
Resizing:
To resize, simply click and drag with the left mouse button on one of the blue cubes at the corner of the blue wireframe. Resizing only changes the size of the whole model, it's not possible to change the model's aspect ratio.
Rotating:
To rotate an object, click and drag with the left mouse button on the light blue spheres on each edge of the wire frame. This will rotate the model around the axis of the edge you have selected.
If you have access to the Management Portal you can now see a live trace of the number of participants in your sessions. You can use this to identify if an outage is impacting particular organisations or sessions, what sessions may be active, or if a particular person is currently connected to an iSee session.
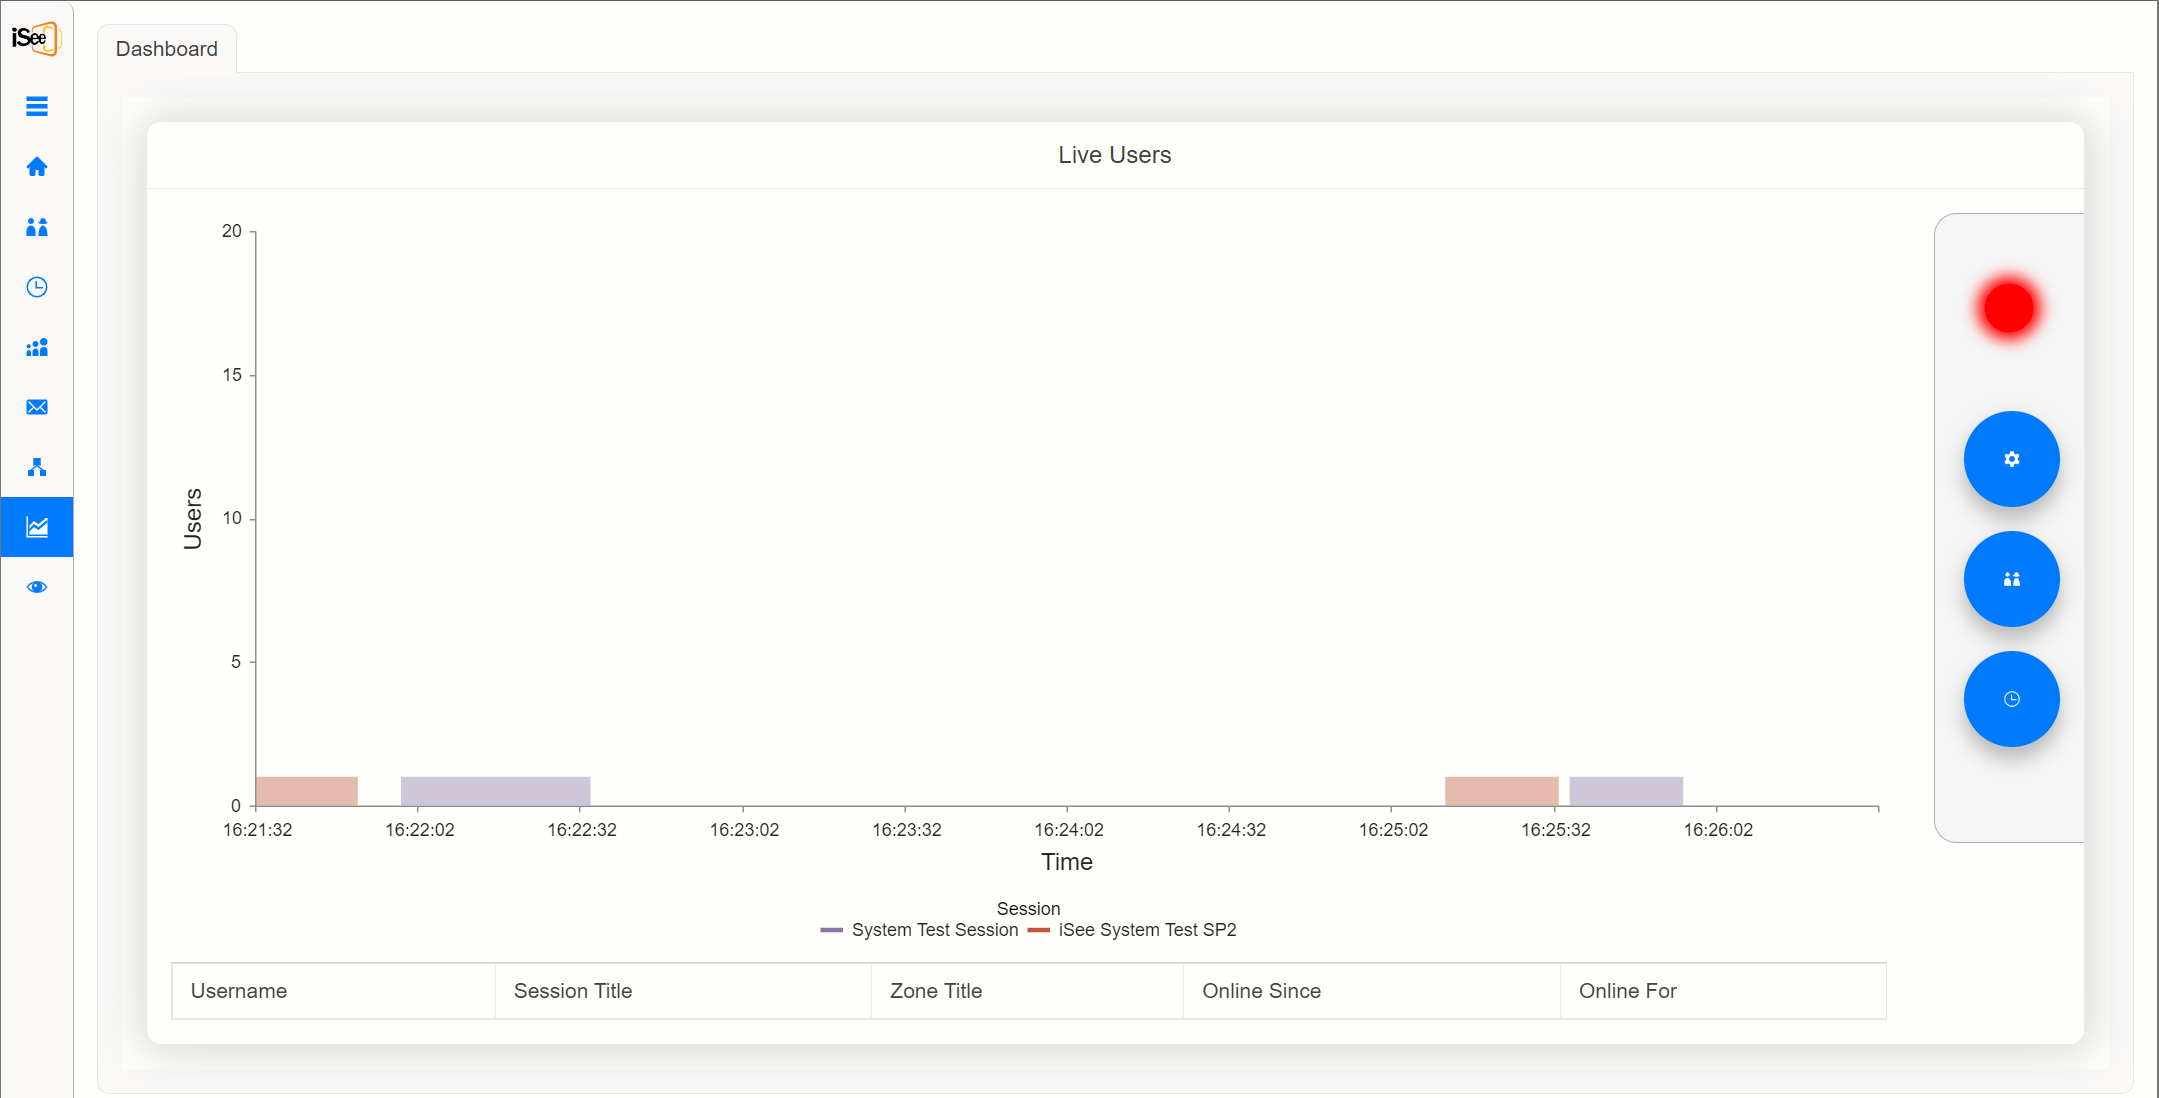
The scrolling time scale shows the latest 30 seconds of usage and the red heartbeat in the top right corner confirms that the data is live.
Clicking the 'options' gear icon enables the view by Service Provider, Organisation or Session (access dependant on your user profile) while the 'users' and 'session' icons below it allow you to restrict the trace to particular users or sessions.
The table underneath the graph shows the currently connected users and gives their session, zone and connection duration information.
Photos from phone and digital cameras are now much higher resolution than needed in iSee and can be reduced to a much smaller size without anyone noticing the difference. This will speed up downloads for people using iSee and reduce load on their machines, allowing either better performance or more images in your iSee sessions.
There are lots of programs that you can use to reduce the file size of images. A simple free one available to Windows users is Microsoft Photos. This will be the default app for viewing photos on your Windows device provided you haven't manually set it to something else.
To resize your photo with Microsoft Photos, first make a copy of it so that you are not editing the original, then simply double click on it to open it in Photos, or right click and choose 'Open with' and then choose 'Photos' from the list.
Once your image is open, click on the three horizontal dots to open the dropdown menu and choose 'Resize image'.

This will open up the 'Resize' panel which will give you the current Width and Height of the image in pixels along with additional information on the current and estimated future size of the image.

In terms of optimising the size of the image for iSee, if people are viewing the image in 3D mode while in iSee then the quality of the image needed is dependent on the quality of their screen. Most students will have a screen with either 1,080 or 720 vertical pixels in total, so more than this is usually a waste. So to resize, make sure 'Pixels' is selected and set the height to 720. Photos will automatically resize the Width for you.
Next select 'JPG' as the file type and set the quality slider. Reduce this to 20% for pictures and 50% for images that have a lot of text with high contrast edges.

Click ‘Save’ and select the location and file name for your reduced size file.
You can create images for uploading to the holodeck using panoramas from your phone and some image editing software such as Paint.net, Photoshop or GIMP.
Using a phone panorama can be a good option as you probably already have a phone that can take good panorama images and you are likely to have it with you when you see something worth taking.
Taking a panorama using a phone requires a few seconds, so it's best for when there isn't a lot of movement going on in the scene while the image is being taken. If there is a lot of movement you are better off using a 360 camera where taking the image is instantaneous.
Step 1. Open your camera app, set it to panorama mode and capture your image. It's easiest if you take a whole 360 panorama, but you can also use partial panoramas if required. You will end up with images such as these:

Full 360 degree panorama of Nobbies Headland in Newcastle taken with a Samsung Galaxy phone

270 degree panorama of Yosemite Valley California in taken with an iPhone 6
Step 2. Check how wide your image is in pixels and use this to calculate the dimensions of your 2:1 holodeck image.
Example 1: The original of the 360 Nobbies Headland panorama is 21,744 pixels wide. As this is a 360 degree panorama the 2:1 holodeck image should have dimensions of 21,744 x 10,872
Example 2: The original of the 270 Yosemite panorama is 13,632 pixels wide. As this is a 270 degree panorama the 2:1 holodeck image should be (360/270) x 13,632 = 18,176 pixels wide and 9,088 pixels high
Step 3. Open your image editing software and create a canvas that is the same dimensions of your desired 2:1 holodeck image
Step 4. Colour your image canvas in your desired colour (a good default is black or white)
Step 5. Paste in your panorama and position it at the vertical midpoint of your canvas. This will give you something like the examples below

360 degree panorama example in a 2:1 image with a black background

270 degree panorama example in a 2:1 image with a black background
Step 6. Resize your image for upload if needed. Note that the resolution of the image displayed in the Holodeck is 4096 x 2048 pixels. The iSee Management Portal will automatically resize your image to these dimensions, but resizing before uploading can reduce the upload time if you are on a slow connection.
Step 7. Sign in to the iSee Management Portal, select your session, go to the 'Images' tab and upload your Holodeck image into your session and you are ready to go!
360 cameras typically output 2:1 equirectangular images that can be directly uploaded to the Holodeck via the iSee Management Portal.
2:1 equirectangular images appear disorted when viewed as a flat image, but look normal when mapped to the spherical surface of the Holodeck. You can see an example of a 2:1 equirectangular image from a 360 camera below.

360 equirectangular image taken of a forest waterfall with an Insta360 camera
It's also possible to find 360 equirectangular images on the web from sites such as flickr.com
The display resultion of the Holodeck in iSee is 4096 x 2048, so it's best to use images that are this resultion or higher for the clearest viewing experience. The iSee Management portal will automatically resize any images to this resolution so there is no need to resize yours prior to uploading unless the file size is to big to upload easily.
Typical 360 cameras can be found from the likes of:
https://www.ricoh360.com/theta/
https://gopro.com/en/au/shop/cameras/max/
All of these cameras exceed the resultion required for the iSee Holodeck.
Google Street View is an astounding resource of 360 images that are geolocated to places around the world. In many places the Street View images have been updates many times, and it's possible to scroll back in time to see how the places have changed over the past few years.
Google Street View images are the property of Google and must be used accordingly.
Downloading images from Google Street View requires installing a program called Street View Download 360 which you can download for free from svd360.com
Once you have Street View Dowmload 360 installed, simply go to Google Maps in your web browser -> find the location where you want the Street View image -> activate street view mode by dragging and dropping the Street View icon (the little yellow person icon) -> use the arrows to move around in Street View mode to get the best position and select the latest or historic image -> copy the URL and past it into Street View Dowload 360 to download the Street View image as a 2:1 equirectangular image for uploading into the iSee Holodeck.
Note that the display resolution of the iSee Holodeck is 4096x2048 - so choose a download resolution larger than this for the best viewing result in iSee. Note that the iSee Management Portal will automatically resize the uploaded image to 4096x2048.
To upload to the Holodeck in iSee sign in to the Management Portal -> go to your session -> go to the 'Images' tab and upload your file into the space for the Holodeck.
There are a number of online websites emerging that use AI to create 3D models. Some work from text prompts and others also allow a 2D image to be uploaded to act as the prompt. Once created and downloaded these models can typically be loaded as custom 3D objects into iSee. This is a rapibly evolving space so new options are emerging all the time.
Two of the best free options currently around are:
Genie - by Lumalabs
and
Meshy - (limited free credits, but also does 2D image to 3D object)
In both cases you will need to create an account.
Using an AI 3D model generator usually involves entering a text prompt that describes the 3D object you would like to create. The generator will then provide one or more low quality options that can then be further refined or improved to a high resultion version before downloading.
Platforms can usually download in any of the .gbl, .fbx or .obj formats that are suitable for uploading into iSee. Created models also generally fit within the upload limits for 3D objects in iSee and so can be used directly without further manipulation.
You can see some examples generated from Genie below. You will notice that some are quite good whereas others are probably unusable... so your milage will vary depending on the model you are looking to develop. In general it works well for things where exact detail and accuracy are not required.
Example 1: 'an electric motor' (quite good)

Example 2: 'a super comfy couch with gree pillows' (excellent)

Example 3: 'Superman playing the violin' (violin part was a fail)

Example 4: 'A pinapple' (good despite spelling mistake in the prompt)

Example 5: 'a molecular model of h2o' (fail - not bad at trying to represent a molecular model... but it's definitely not H2O)

Example 6: 'A black pug puppy with a smiling face' (Excellent)

The emergence of AI techniques is making it much easier to scan real world objects with your phone to create 3D models that can be imported into iSee.
The input for 3D model creation is usually a series of overlapping images or video of your subject from all angles. The AI then takes these overlapping images or frames from the video and uses them to construct the 3D model.
There are three basic AI techniques:
- Photogrammetry - most spatially accurate, but also computationally intensive and doesn't work well for reflective or shiny objects
- NeRF (Neural Radiance Field) - much faster and copes well with shiny and reflective objects
- Gaussian Splat - very good and comutationally efficient, but doesn't output to a 3D mesh object for iSee automatically
There are now a bunch of applications available that do the computation for you in the cloud so you don't need to get a powerful computer. Some popular apps include Luma 3D Capture, KIRI Engine and Poly.cam
For those that don't like to install apps on their phone, Luma 3D Capture and KIRI Engine Web are available where you can take the images or video on your phone and then manually transfer to your computer to upload to the website for processing.
At the time of writing, Luma 3D Capture is free, while NeRF processing in KIRI Engine is a paid option.
An example workflow using Luma 3D Capture and NeRF AI processing to a 3D model for iSee on an Android Phone:
Step 1: Scanning your 3D object
Put your object somewhere you can easily move around it and in good even lighting conditions and then take a video walking smoothly around it three times. In each rotation use a different camera height e.g. below, middle and above.
Step 2: Upload your video and submit it for NeRF 3D model generation
Step 3: Download your model as a *.glb file and upload it to your iSee session
Troubleshooting:
Sometimes the AI doesn't really know where your subject starts and ends, and so can include other parts of the real world and not just what you want in your model. To trim this you can bring you model into a program such as 3D Builder or Blender and trum off the unwanted parts.
Occasionally your model will be too big for loading into iSee. This could be too many triangles (the mesh has too many points) or too big a texture (the model colouring file is too big). You can also reduce these using 3D Builder or Blender and the 'decimate' tool... although this is not a trivial process and requires some familiarity with these programs.
After signing in, your browser will ask you for permission to use your Camera and Microphone when you first reach the 'Join' screen. You need to agree to these settings to have your Camera and Microphone available in iC2.